
Interactor Components
Most of the components have highly detailed tooltips on their respective headers and properties. Also, you can click on their mini book icon (top right corner of the component) to open its documentation page as a shortcut.
Interactor
Main component that needs to be put on player gameobject (Preferably on the root gameobject that has your controllers). You can use it for 10s of players/NPCs in the same scene to interact with the environment or themselves. It runs an update loop for all of its effectors in FixedUpdate to check their states and relations with the environment or between each other. And sends interaction calls to InteractorObjects and InteractorIK.
When you're done with initial setup, you'll most likely won't need to see it. So if you're not fan of the custom UI, you can fold it or minimize it because you'll be working with InteractorObject and InteractorTargets mostly.
Effector - A subclass of Interactor that is responsible for one body part (Hand, foot or body for humanoids), its connection rules for its interactions and enables Inverse Kinematics for it.
Target - Short for InteratorTarget. Destination for an effector for an interaction. It is located mostly on the interacted object. Usually holds a similar structure with specified effector bone (Hand for example) with different rotation values to create gestures at the destination.
Interactor uses the player's sphere trigger to detect nearby interactions (InteractorObjects). Orders them by distance, and checks them in every frame for its effectors. The checks and the resulted behaviors depend on the interaction type. Also checks the effector's current state if they're available to interact, available to co-operate with another effector; if any of them are already interacting, is that one's requirements are still valid, etc. Also, user inputs or events run a different but similar function to start and stop interactions. Besides the main functions, there are lots of other controls in it.
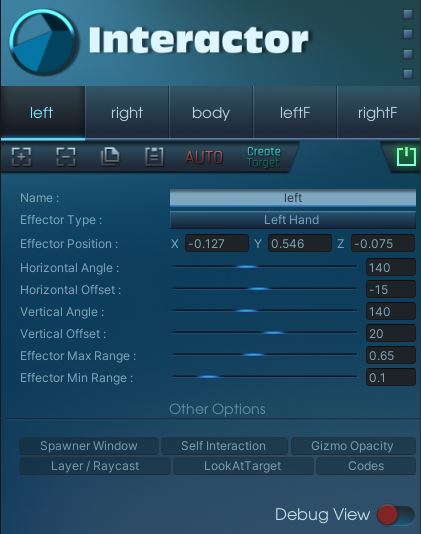
Logo - If you click on the logo, it will minimize and give you more space on Inspector.
Right Top Buttons - These are shortcuts for documentation, forum thread, sending a message to me and the store page. All of them have descriptions of them as a tooltip.
Effector Tabs - Every effector has it’s own settings. You’ll see selected effector’s gizmo on SceneView. You can add, delete, copy these settings and paste them onto another effector. Also, you can enable (Green) and disable (Red) the effector on the top right power button. A disabled effector won’t work as it never exists.
You can also use Auto button to make automated adjustments for its settings after selecting its Effector Type.
And lastly Create Target button automatically creates the selected type target from player bones and places it into hierarchy. It adds InteractorTarget and sets its type as well so all you need to do is adjusting its position and rotation offsets and create the prefab.
Name - You can give any names for your effectors. If you leave blanks between the words you gave, they will get proper line positions on effector tab buttons. Long words will stay center aligned.
Effector Type - Interactor has player parts for biped humanoids like hand, foot or body. Other extra parts like shoulders and thighs are placeholders for coding on your own.
Effector Position - Effector’s position offset relative to the sphere trigger center. (0, 0, 0) position means it’s on the center of the sphere. Position values can’t go out of the sphere radius because Interactor checks only the targets inside of this trigger. Also, effector can’t get close edges within its own ranges. It will automatically arrange itself around the trigger edges if you push it more. See Effector Max/Min Range for more detail.
Horizontal Angle - Effector’s horizontal angle value. Interaction object’s targets should be in these angles to be interactible. You can see angle values on SceneView gizmo with white small texts.
Horizontal Offset - Set horizontal angles in any horizontal direction.
Vertical Angle - Same for the vertical axis.
Vertical Offset - Same for the vertical axis.
Effector Max/Min Range - Effector’s range to start an interaction. It can’t be bigger than the sphere trigger or intersect with it. If the effector’s range touches the sphere trigger’s edges, it will be pushed to center to fit inside automatically (Effector offset will be repositioned). If the effector position won’t move closer to the edges, it means it’s range touches the edge of trigger area. And it will slide over the edge if you try to push.
These settings work only for this effector. Every effector has it’s own rules. You can copy these settings with Copy Button and paste them onto another effector to set its values if they're similar. Or you can push the Auto button then make final adjustments by yourself.
Other Options
Spawner Window - Toggles InteractorTargetSpawner window.
Self Interaction - If you wish to use self interactions, you should assign the parent object here. More info on Interaction Types > Self Interaction.
Gizmo Opacity - Set SceneView gizmos' opacity value.
Layer / Raycast - Custom player layer name and distant interaction range settings. Distant type objects can be interacted by crosshair within this range. Raycast will shoot only this long.
LookAtTarget - Looking at the interacted object and changing the head bone settings.
Codes - Shortcuts for opening Interactor effector loop in the main script or to expose more properties on the inspector in the editor script. So you can easily open main and editor scripts from here.
Debug View - Main switch for turning on and off SceneView gizmos and ExtraDebugs. Interactor gizmos stay on SceneView as long as the debug switch turned on, even Interactor object is not selected.
You can watch the scripting tutorial to have deeper understanding how Interactor scripts work and how to customize/create new ones.
Dependencies
Sphere Collider on same GameObject.
InteractorIK for humanoid / non-humanoid avatars.
InteractorTargetSpawner Window
InteractorTargetSpawner is the prefab holder window and saves those prefab lists in specified project folder as ScriptableObject. Save file is called as SaveData and can be used for different setups. You can create a SaveData for a specific need and change save file temporarily with some other SaveData to switch back later. So this way you can switch between different SaveDatas for different characters or separete use cases (For example, you can have a spawn list just for grabbing prefabs). Active SaveData showed at the top of the window and can be replaced by any time. But you always need a SaveData to use Spawner window & SceneView right click menu. When you add your first effector to the Interactor, you will be asked for creating one. Don’t forget, when you close a SaveData by clicking the red X button, the last data will be saved as it is before closing it down.
You’ll see all the effectors and the selected one you have on Interactor that works in sync. If you want to add more than one prefab for each effector tab, you need to attach the main prefab first. Then you can add other prefabs altogether by dragging them into the drag area (No need to worry about repetitive ones, it will automatically check for duplicates). You can remove any of them by clicking the red X button. If you want to remove all prefabs, just remove the main prefab, it will wipe out the list for that effector.
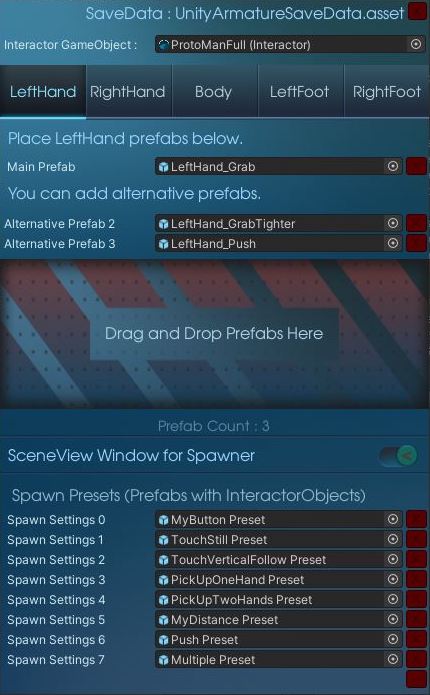
To open InteractorTargetSpawner, you can toggle it from the bottom part of Interactor or select Window>Interactor>Interactor Target Spawner from the top Unity menu. When you open it, it also works as a toggle for SceneView features such as the SceneView Interactor button, SceneView window, and right-click spawn selection menu. If you have multiple Interactors in your scene, InteractorTargetSpawner will show the data for last selected Interactor.
Spawner window has some options for the designing stage. Once you have prefabs on it, SceneView right-click menu will be activated. Just select any prefab you want and it will be spawned as a child of the right clicked gameobject, on the clicked spot. You have four rotation modes for the spawning. Default Prefab Rotation (Same rotation values in its prefab), Surface Rotation (Prefab's forward will be rotated towards to clicked surface's normal direction), SceneView camera direction and SceneView camera direction for Y-axis only.
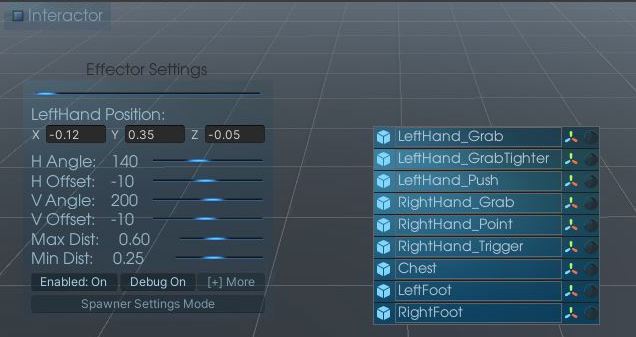
Besides of the right click menu, also SceneView window gets enabled by opening the InteractorTargetSpawner window. You’ll see an Interactor toggle button on top left corner of the SceneView when Spawner window opened. That toggle activates the Effector/Spawn Settings window on SceneView. InteractorTargetSpawner window doesn’t need to be seen all the time, just put it on behind of any editor tab to keep the Effector/Spawn Settings window enabled. Once you close InteractorTargetSpawner window, all the SceneView features will also close down.

SceneView window has two modes as Effector Settings and Spawn Settings. Effector Settings will help you adjust your effector rules, even in SceneView fullscreen mode. But you mostly use the Spawner Settings which has shortcuts for selecting spawn direction and presets.
Add Pivot - When spawning your InteractorTargets in the scene, it also adds a Pivot gameobject between the spawned target and clicked gameobject. It has some benefits and it is quite useful (Explained in Tutorial Videos and InteractorObject component).
Add Components - Enables preset selection (if you assigned any) and adds same components from the selected preset to clicked object. So if you have a prefab that holds some InteractorObject settings on it, it will add same components and copy the same settings.
InteractorTargetSpawner has some additional settings besides of the SceneView window.
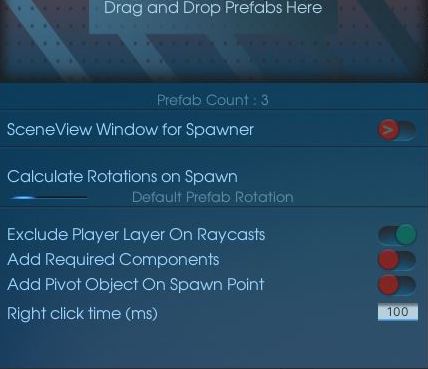
Exclude Player layer on raycasts - This will ignore the player's triggers and colliders when raycasting in SceneView. Otherwise, it could become quite annoying while working around the player gameobject because it can spawn target prefabs on player's triggers/colliders instead of intended gameobjects.
Add Required Components - Same as SceneView window Add Components
Add Pivot Object on Spawn Point - Same as SceneView window Add Pivot
Right click time (ms) - The maximum time in milliseconds that needs to pass before not moving the mouse cursor when right clicked. If you move mouse cursor after this time passed, right click menu won’t show up. To prevent conflicts for default SceneView right click behaviour since it’s used for the camera rotation. If you’re slow clicker, set higher values and vice versa.
InteractorIK
InteractorIK handles the player IK and actually works like a wrapper for IK solvers with lots of internal features. It is responsible for your player's hand & feet bone rotations with their two parents (forearm & arm or upper legs & lower legs) and their timings. It is not a IK solver and uses Unity IK or Final IK for humanoid avatars. For non-humanoids, it has a Two Bone IK solver that added to player automatically on runtime.
Assign its Animator by hand for best practice. If your animator component is not on the same GameObject, see the details of AnimatorCallback usage.
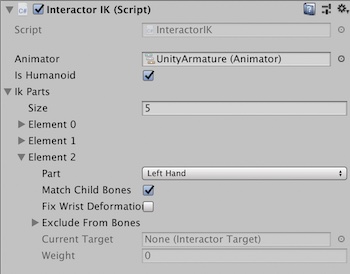
IK Parts should consist of a maximum of 5 elements because there are 5 effector types right now. It should be the same amount and type as Interactor Effectors. The order doesn't important.
Is Humanoid - True by default for humanoids (Most cases).
If your avatar is not a humanoid, disable it. Look at First Person ExampleScene for a non-humanoid first person rig usage. And you'll have some extra settings for your IK parts. You can see their info on their tooltips for the setup.
Part - Effector type.
Match Children Bones - Global toggle for this effector. If disabled, only the target itself will get the rotation (Hand's rotation for example). If enabled, the target's child bone rotations will also be set (Fingers for example) so you can have the same gestures as your InteractorTargets.
Fix Wrist Deformation - When disabled, hand rotation will focus on wrist but this can cause deformation on the wrist when target rotation is too much. Enabling this option will fix wrist deformation with minor performance cost by distributing some of the rotation to lower arm (Like in real world).
Exclude From Bones - If you wish to exclude a transform (with its children) from this bone hierarchy, assign here. (An extra GameObject on your avatar's hand by default for example. So, this way your bone count won't change and excluded objects won't be included for matching child rotations.) Hands and feet only.
Current Target - Current target for this IK Part. Debug purposes only, will be changed by Interator in runtime.
Weight - Current weight for this IK Part (0 is default animation position, 1 is target position). Debug purposes only, will be changed by InteratorIK in runtime.
InteractorObject
Main component for interaction objects. Most of the interaction settings located on InteractorObject. Interactor, checks InteractorObject and its InteractorTargets. Most of the interaction types require InteractorTargets. On start, it gathers all InteractorTargets into an array for later use. It also holds states for the interaction object and works as bridge between Interaction Type behaviors and Interactor.
Interactor gameobject itself can also be an InteractorObject if you add, so you can interact with a player or NPC. Interaction type needs to be selected and also, it needs a Settings file under the Type Specific Settings section. Without those, it will disable the gameobject on start.
Regular settings(Interaction Settings, Speed Settings, Look Settings, Other and Events) are specific to that interaction but Type Specific Settings are shared between the InteractorObjects that use the same Settings file.
Pivot object works as an empty buffer object between the InteractorObject and the InteractorTarget. When interacted, the pivot rotates its forward direction towards to negative effector direction. You can specify the axes you want it to rotate. It can be useful when you want your target or targets to rotate where your player interacts. There are lots of examples in ExampleScenes.
All InteractorObject settings have detailed tooltips if you hover with cursor on them.
You can watch the scripting tutorial to have deeper understanding the relation between InteractorObject and Interactor components.
Caution: Events will be removed from InteractorObject until v1.0
You can use InteractorTarget event system instead, which is better and more flexible.
Dependencies
Interaction Type Settings file
InteractorTarget(s) (Except Animated and Distance interaction types)
InteractorTarget & InteractorPath
InteractorObject defines the interaction but InteractorTargets tells where the character will interact to and how it will reach to that destination. It consists of two parts: Target itself and InteractorPath.
Target usually has the same bone structure as its effector's bones since you create targets by copying your bones. Child bones in the target will define the gesture you want when your effector's bone reaches the destination. Also when you select InteractorTarget, you'll see its bones and their rotations in the SceneView and you can rotate the bones directly from SceneView with useful gizmos. If you select another InteractorTarget, it will show the previous selection as a simplified version and all the previously selected InteractorTargets will be visible in the SceneView until you select nothing in the hierarchy. This will help you work faster.
All InteractorTarget settings have detailed tooltips if you hover with cursor on them. But some of them will be explained here as well to make things clear.
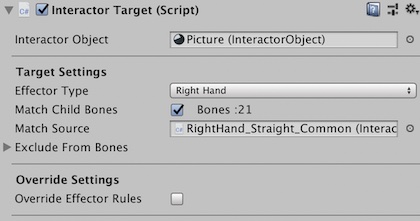
InteractorObject - Every InteractorTarget need to be connected to InteractorObject to work. Think it is the owner of that target. Also, Speed Debug feature of InteractorTarget needs speed/duration properties from InteractorObject to work. So when you create or spawn your InteractorTargets, check their InteractorObject property. Normally, it will get that from parents if it is empty but assign it manually for best practice. We have this property because sometimes your InteractorTargets can be on different objects or you can have more than one InteractorObject in its parents. So manual assignment allows you to separate their jobs.
Match Source - If you're using Match Child Bones feature which allows you to match the gesture of your target in your effector bones on the destination, you can consider using Match Source. Because it gives you an optimization chance that allows you to share same gestures on more than one target. For example, if you have 5 fist gestured hands in your scene, that's nothing but if you have 100 same fist gestures, then you can share it between them. Put one in a safe place, and assign it to the other 100 targets' Match Source. All of them will use the source child bones instead of creating their own arrays. But be sure to not destroy the shared source until you need the last of 100 targets.
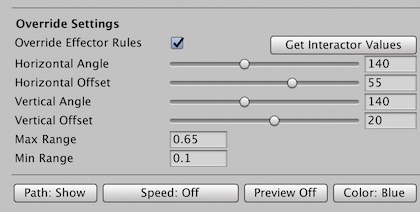
Targets also have Override Settings. When you enable it, you'll see some extra settings that are similar to effector rules. If you want to use different rules just for this target, you can override the rules. For example, if you want to interact with a specific target with 0.3 less maximum distance, then you can press the Get Interactor Values to easily set the same rules and adjust its new maximum value. You need to specify all rules because when you enable Override, all the rules will be overridden. That's why Get Interactor Values button exists, to help you fill the same values that you don't want to override.
Next, you have four gizmo buttons which are also accessible with shortcuts described down below. Path button is a global toggle that shows InteractorPath for InteractorTargets in the SceneView or hides all.
Speed Debug shows speed changes on the path. It needs InteractorObject to get its speed/duration values. If it is null and you enable Speed Debug, it will get it from the parents. So if your InteractorObject is on another object, assign it manually. Speed Debug shows speed changes relative to time, not the points they represent! Because it is impossible to show speed changes relative to their position in a single dimension line, speed can be negative too. Speed Debug is just there for giving an idea of how it changes in total duration. To see speed change better, you can use the Preview button to activate preview of the interaction. It will show exactly the same speed in SceneView until you toggle it.
InteractorPath
InteractorPath allows you to use bezier curves system for your effector bones' route to their destination and their back routes to start positions. With added extra features, it presents pretty much infinite flexibility for your interactions. It has more than 2k lines of codes in its editor and lots of codes in itself but these are just for easier workflow. In runtime, it runs blazingly fast and simple.
You can watch the InteractorPath Tutorial for more details.

All InteractorPath settings have detailed tooltips if you hover with cursor on them. But some of the features will be explained here as well to make things clear.
InteractorPath is consist of two parts: TargetPath and BackPath. TargetPath is the route that starts from the character's current animation's bone position to the target's position (Upper path in the picture), and BackPath is the route that starts from the target's position to back to the current animation's bone position (Bottom path in the picture). And start position of TargetPath is the same with end position of BackPath (and vice versa). So TargetPath is the path where your hand is going to the destination on the object and BackPath is its returning path to its original position. They are also called Segment 0 and Segment 1 in this case.
You can create middle segments anytime to adjust paths shape. If you add a new segment in TargetPath, then it will have Segment 0 and Segment 1 and BackPath will have Segment 2. So their segments are actually in the same list.
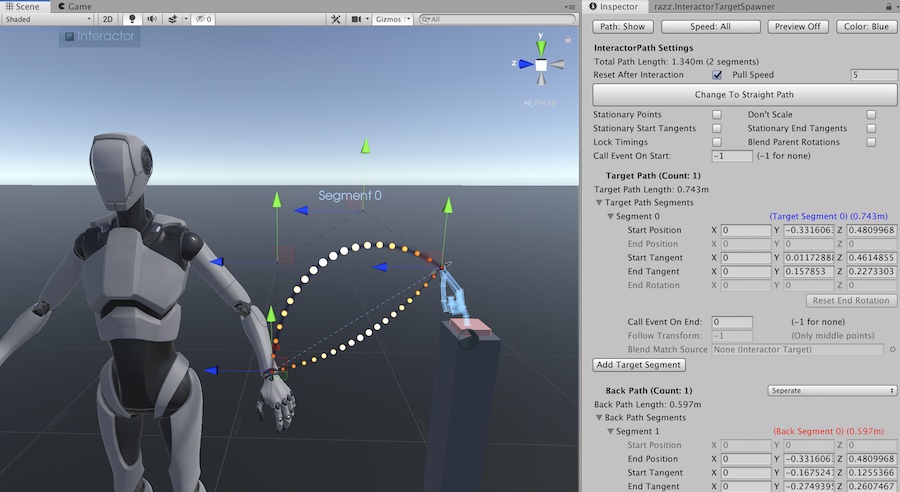
By default, Bezier mode has the same TargetPath and BackPath but you can change it. If you want the effector bone to follow the same path when going out and returning, use the Same mode. If you want it to return straight back, use Straight mode. If you wish to use a different path for BackPath other than the TargetPath, use Separate mode.
Start position of TargetPath is a temporary position and not connected to anywhere because it will move to your effector bone when interacted to create the bridge between your bone to target. When it moves, it will also rotate & scale the whole path and points it consist of along with it. So InteractorPath won't rotate with the object or InteractorTarget, it has independent rotation. When you design your path, consider that possible movement and where your bone will interact and pull your start position to. If you don't want other points to move with the start point, you have some options on the Interactor Path Settings.
Tangents - Each segment has 4 points. Start Position (Also the end position of the previous segment if it is not Segment 0), End Position (Also the start position of the next segment), Start Tangent (Start of the curve from Start Position) and End Tangent (End of the curve at End Position). Tangent is the control point that defines the curve amount of that point. When you hold Ctrl (or Command on Mac) in the SceneView, you can select segments of the InteractorPath and only those 4 points will be shown.
Reset After Interaction - Start position will move to effector bone position and path will scale accordingly. Original path will be restored when this object is destroyed but if you have issues when using same interaction, you can reset to original after each interaction end.
Pull Speed - When interaction is in second half, which is BackPath, if target and effector moves away of each other, this Pull Speed will increase the speed to end the interaction earlier. When player interacts and moves away from object while interacting, its hand will stay in the middle because back path length would increase and returning bone would have to go more, which makes it stay in the middle depending on the player distance to object. That can be worse when end duration is longer or distance increase is faster. Pull Speed helps to fix that. Value will be multiplied exponentially if distance is increasing.
Stationary Points - When interacted, start position will move to effector bone position and whole path scale and rotate accordingly. Enable this if you don't want to move other points and tangents. Then only start position will change.
Don't Scale - Similar to Stationary Points but it will rotate the path without scaling it.
Stationary Start Tangents - When start position changes at the beginning of interaction, this allows to move its tangents with it (Start tangent of the first segment and end tangent of the last segment).
Stationary End Tangents - When start position and the whole path changes at the beginning of interaction, this allows to lock the target tangents with target point (End tangent of the last target segment(forward) and start tangent of the first back segment).
Lock Timings - This will lock all segment times so when a segments' length changes, its speed will also change to fit same time. It doesn't matter when all segments change uniformly. But when only one of them change (like on Stationary Points option or FollowTargets to change specific point) those segments' time will also change because it will take different time to end that segment, which will distrupt other times and you won't get your exact Custom Curve time/distance ratio (like in the preview). So enable this when you use Stationary Points or FollowTargets to get same timings with your Custom Curve on InteractorObject speed settings.
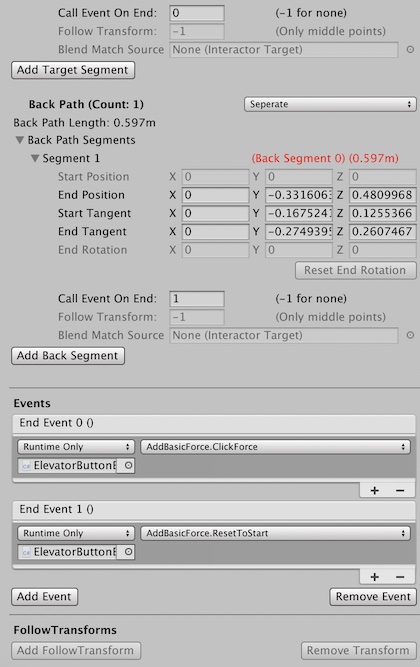
Events & FollowTargets - You can add events to any part of the path and make the middle points follow any gameobject in runtime. Add events into the list, assign the added event's index number to any segment end point (Call Event At End property of a segment). That's it, that event will be called when your effector bone will pass that end position in the path. If you want to call an event before starting, there is another property called Call Event On Start. The same goes with the FollowTransforms too. If you want any segment point to follow a gameobject, you can add a FollowTransform in its list, assign a transform to the newly added element, and assign its index to the FollowTransform property of the segment that you want to modify its end position in runtime. You can only add FollowTransforms when you have middle points in your path.
You can even share same events and followTransforms between multiple segments if you wish by giving the same index number. If you don't use those features, they will be empty lists with no extra cost.
InteractorPath Keyboard Shortcuts
(Command for Ctrl, Option for Alt on Mac)Ctrl + Alt: Enable/Disable Path View
Hold Ctrl + Middle Mouse: Speed Debug Modes
Hold Ctrl + Hold Shift: Preview Interaction on Path
Hold Ctrl + Hover Cursor on Path:
Select Segments and Points on Segment
Hold Ctrl + Left Click: Add Segment at Selected Point
or Convert Straight Path to Bezier Path
Hold Ctrl + Right Click: Delete Selected Segment
or Convert Bezier Path to Straight Path if no segments left
Dependencies
InteractorObject
Full Body IK Behaviour
Interactor Full Body IK aims to improve body movement beyond the capabilities of the Default Interactor IK, which relies on Unity's built-in IK. Instead of only manipulating the arms and legs, Full Body IK utilizes the entire body’s bones, allowing the player to pull themselves toward objects, even if they are out of reach.
It works best with OrbitalReach. OrbitalReach uses an animation blend tree to help the player reach objects, but it has limits because of the animations. Full Body IK can take over when those limits are reached, allowing the player to reach further. Alternatively, it can work without OrbitalReach to pull the body enough on its own, bypassing the OrbitalReach's limits in needed situations.
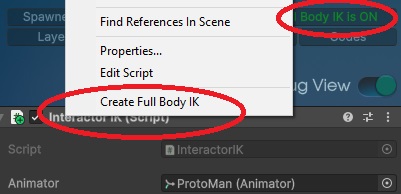
Setting it up is very simple, as it is fully automated. For new setups, simply enable it on the Interactor and press the "Auto" button on any Effector in the Interactor. It will be added automatically and assigned to the Interactor IK. That's all! You can now use it and toggle it on or off at runtime by adjusting the settings on the Interactor.
If you already have an Interactor but don't have Full Body IK set up yet, follow these steps: first, enable Full Body IK on the Interactor. Then, right-click on the InteractorIK component and select "Create Full Body IK." After that, you will be able to use it.
The Full Body IK system works efficiently and stays active all the time, even when there is no interaction. It includes a roll feature that controls the arm twist bones for more natural arm rotations during interactions. You can adjust this by enabling the debug menu and changing the elbow pole settings. Each InteractorTarget can also override the global elbow settings. This gives you the freedom to adjust how the elbow bends for each interaction. This is useful because the elbow may need to bend to the side, back, or up, depending on the angle, to look more natural.
One limitation of Fullbody IK system is when using picked up items. If you keep its hold point on your bones and if this position is out of reach of arms lenght, it will start to pull your arm and body and since the hold position is also on this hierarchy, it will move further as well which will create unending loop of movement. So keep that in mind when you hold items on your bones.
Dependencies
Interactor and InteractorIK
Can't work on Final IK version
Hit Reaction
Hit Reaction is a physics based reaction system designed for realistic character responses to impacts. With Hit Reaction, your character can autonomously respond to hits with procedural animations without the need for pre-made hit animations. This eliminates the requirement for manual animation setup, as you can trigger reactions from various hit directions and forces.
By automatically calculating impact forces and directions, Hit Reaction eliminates the need for manual animation blending and ensures precise reaction angles and intensities, sparing you from the hassle of creating multiple hit animations for different scenarios.
In the workflow, when the character receives a hit through the TriggerHitReaction method, the Hit Reaction component calculates the impact force and direction, then applies procedural body movements using the Full Body IK system.
Setup is very simple. Just add it to the player near the Full Body IK Behaviour. You can use the pre-made settings or adjust things like maximum reaction ranges and speed. Once that’s done, it’s ready to use. You can check the examples to see how to trigger a hit. The Hit Controller component can also use this system automatically, without any extra setup or manual calls.
Dependencies
Interactor, InteractorIK and Full Body IK Behaviour
Can't work on Final IK version. Final IK has its own Hit Reaction.
Hit Controller
Hit Controller is a system for creating precise and repeatable hit or use actions for objects or other characters. With Hit Controller, you can create motions with custom paths, timing, and force. It does not need an Interactor and can also be used in other cases where you need to move or animate something. When enabled, it animates the given transform with key inputs, so you need to control when to turn its hits on or off.
By setting start and end positions with bezier curve controls, Hit Controller removes the need for animation timelines and makes it easy to create accurate hit paths and timing without needing many animation clips. You can adjust points in the Sceneview, and you can also use the target transform’s current position as the start or end point. To adjust the curve of the paths, you can use control points. Control points move with start/end point in Local mode for easier editing.
If you want to use it with Hit Reaction, you need to assign both Interactors. This will automatically activate and find the Hit Reaction on the hit character. It will also use the hit end positions to decide hit points for reactions without using physics. If you put Hit Reaction on a child pivot at the same position and rotation as the player, the pivot will rotate to face the player, so your hit paths will always point in the right direction.
Dependencies
None
InteractorAI
InteractorAI is a comprehensive pathfinding solution designed for seamless interaction in your project. With InteractorAI, your character can autonomously navigate to interaction points and initiate interactions without the need to halt its movement. This eliminates the requirement for manual interactor effector rules, as you can start interactions from both close proximity and larger distances.
By guiding the character to predestined interaction spots, InteractorAI eliminates the need for manual positioning and ensures precise interaction angles and positions, sparing you from the hassle of maneuvering around objects to find optimal interaction points.
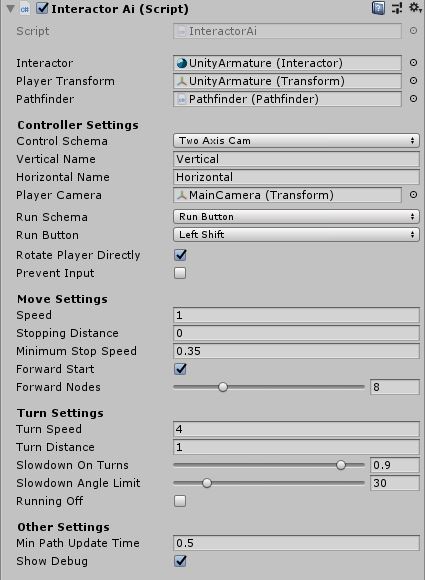
In the workflow, when the player with InteractorAI enters a PathGrid, the PathGrid triggers the Interactor component and sends all AI-enabled InteractorObjects to it for activation. To enable AI on an InteractorObject, it requires a transform defined in its Ai Settings. This transform specifies the position and rotation for the player to move towards. Once any of the InteractorObjects are activated, the player will automatically navigate to that designated spot. When the Interactor leaves the PathGrid area, all added InteractorObjects will be removed.
You can watch the detailed InteractorAI tutorial that provides in-depth guidance on how to use InteractorAI effectively.
Or you can refer to the Interactor and InteractorAI Integration tutorial which cover setting up InteractorAI with various controllers such as Invector, Opsive, and GKC.
Additionally, detailed tooltips for each variable on the component are available by hovering your cursor over them.
Dependencies
Interactor.cs needs to be on the same object.
Needs to be included in a PathGrid.
Pathfinder needs to be in the same scene.
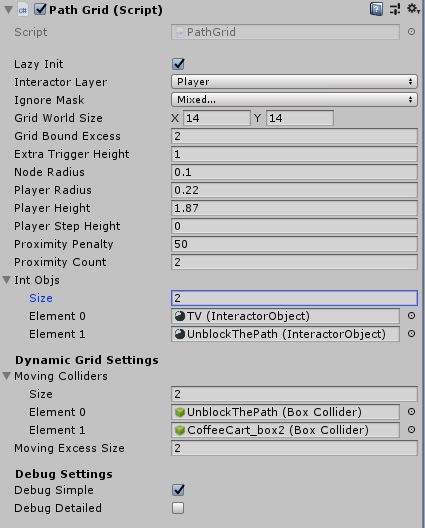
PathGrid
The PathGrid component provides functionality for creating and managing a grid-based pathfinding system. It creates the the walkable and unwalkable areas like Unity NavMesh, but in a really fast way in runtime. The player layer can be specified to limit checks to only players, and certain layers can be excluded when checking the grid for unwalkable areas.
The size of the grid can be determined visually in the SceneView, ensuring proper coverage of the desired area. InteractorObjects added to the grid are checked for their aiTargets within the grid bounds. The height of the grid trigger can be increased to account for sloped terrain or floors. Smaller nodes provide higher mapping accuracy but increase the time required for grid creation and pathfinding.
The PathGrid component applies proximity penalties on nodes surrounding unwalkable areas, allowing the pathfinder to prioritize paths with lower penalties and keep the player away from obstacles. The component also supports dynamic grid settings, enabling the addition of moving obstacles to the grid. Debug settings provide simplified or detailed debug modes to visualize unwalkable areas, proximity areas, and interaction targets on the grid.
You can watch the detailed InteractorAI tutorial that provides in-depth guidance on how to use InteractorAI with PathGrid effectively.
Additionally, detailed tooltips for each variable on the component are available by hovering your cursor over them.
Dependencies
Pathfinder needs to be in the same scene.
Pathfinder
To enable pathfinding for InteractorAI in a scene, a single Pathfinder component is required. This component can be placed on any GameObject within the scene. The Pathfinder is optimized for speed and can efficiently process multiple path requests from different InteractorAIs simultaneously.
The pathfinding algorithm used in the Pathfinder component is based on Sebastian Lague's repository but has been extensively modified to suit the specific requirements of the system.
AnimAssist
The AnimAssist component needs to be on the Interactor GameObject to enable its player to use it. When you click the 'Add Interactor Layer' button, it adds all animation clips to its Animator Component but also resets the previous Interactor Layer. Therefore, if you want to add new clips to the previous ones, you need to add them to Animation Clips as well so that they will all be included. Also Remove Interactor Layer button removes the layer and speed parameter (animAssistSpeed).
To use AnimAssist, you need to enable it on any InteractorObject through the Animation Assist settings. It uses string names instead of the Animator hash workflow because these animations will be called only when used in interactions, unlike walking animations, which are used for each frame. As a result, it uses string names in the InteractorObject settings.
You can adjust added states some settings. To end them sooner, you can edit their exit time (But Start Times on InteractorObject settings should be earlier then exit time to start interaction). To adjust their speed, don't use Speed parameter on state settings, instead use InteractorObject AnimAsisst speed settings. To start animation with offset, there is also Clip Offset settings on InteractorObject.
You can watch its tutorial at videos section.
OrbitalReach
The OrbitalReach component needs to be on the Interactor GameObject to enable its player to use it. Once added, you need to include its layer in your animator controller. If you haven't added it before, simply click the "Add OrbitalReachLayer" button, and you're done. It will handle all layers and parameters for you, and you can remove them anytime by pressing the "Remove OrbitalReachLayer" button.
To use OrbitalReach in your interactions, you need to enable it on any InteractorObject through the Interaction Settings. Only hand interactions can be used (Multiple interaction types are an exception). Supported interaction types include ManualButton, ManualSwitch, ManualRotator, Multiple, and Pickables. Two additional settings on InteractorObject are OrbitalLateStart and OrbitalLateEnd. These are for slowing down or speeding up the orbital animation to reach the object.
OrbitalReach has calibration settings on its component. Default values are suitable for 170-180cm characters. However, if your character is a significantly different size, you can adjust its settings before adding its layer. To aid in calibration, you can enable debug mode and use the OrbitalPositioner to test any angle/height/distance more easily.
You can use one OrbitalReach for your interactions at a time. Therefore, if your interaction has a pause, like ManualRotator, you can't use another interaction with your other hand simultaneously, if it is also OrbitalReach, because the body can only reach one object at a time.
You can watch its tutorial at videos section.
InteractorPoints
The InteractorPoints component is utilized for picking up objects and provides the necessary transforms for holding and moving items around or on the body. If you don't already have it, the Interactor will create itself at runtime. However, for full functionality, it is recommended to create the InteractorPoints yourself and assign the required points.
You can watch its tutorial at videos section.
Inventory
This is a fully functional inventory system designed for use with pickable interactions. It supports multiple inventories, allowing you to change, assign, resize, and reorder items in runtime. The system serves as an excellent foundation to build upon for creating your own inventory system. Its main components include Inventory, InventoryRenderer, Item, and ItemDatabase scripts. Additionally, there is a helper script(CreateInventoryIcon.cs) that dynamically updates during runtime to create item icons from scene objects.
You can watch its tutorial at videos section.
ExtraDebugs
ExtraDebugs helps you to debug your interactions better. You can examine what stage your current interactions are. If something is wrong with an interaction and doesn't start, it may help you to find the reason.
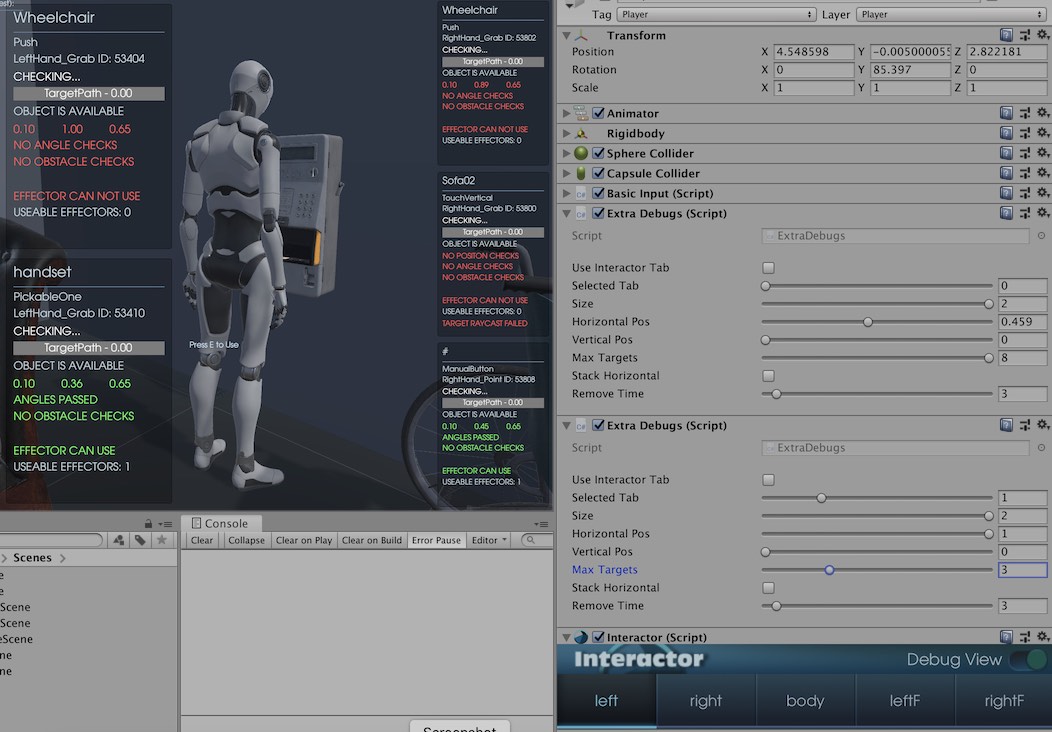
To use, put one ExtraDebugs on the Interactor GameObject you want to debug. Although, you can use multiple ExtraDebugs simultaneously since it shows interactions for just one effector at the same time. You can select the effector you want to debug or use the chosen effector from Interactor(Use Interactor Tab). And lastly, don't forget to enable debug option from Interactor.
There are lots of options to fit your use cases. If you're using vertical resolutions for mobile, you can stack debug boxes vertically; if you're debugging multiple effectors altogether, you can adjust the screen positions for each one of them; if you have too many interactions around, you can limit the box amount and their sizes, and if you want to see interactions left out of your area, you can increase the remove time to let them stay on your screen longer.
Don't use ExtraDebugs if you're testing your performance. They have a minor effect but still, they have a slight overhead to debug with them.
Currently ExtraDebugs.cs doesn't work with the built apps and is intended to use within Unity Editor PlayMode.
Dependencies
Interactor.cs needs to be on the same object.
BasicUI
BasicUI written just for the example scenes to demonstrate the interaction selection with UI and inputs. You edit the screen text and enable the crosshair on GUI. When added to the player, all interactions in the player area will be showed and will be selectable to interact (except Self Interactions). Interaction selection handled with mouse wheel input and when you change, it changes the "selectedByUI" variable in Interactor which holds the index of focused interaction in area.
BasicUI will get the player Interactor from the same object. If it can't find the Interactor, it will be disabled.
BasicInput & BasicInputInteract
BasicInputs are modified Unity Standart Asset input classes. They work for both legacy input and the new input system from Unity. They handle the inputs as well as send interaction start calls to Interactor with StartStopInteractions(). The selected interaction assigned by BasicUI with mouse wheel selection. BasicUI sets "selectedByUI" (which indicates the index of interaction in area), BasicInput sends start or stop call with user input. Interactor will decide if that call will start an interaction or not depending on effector checks.
On the other hand, BasicInputInteract is a simpler version of BasicInput and has only start stop functions (E or Click) without any other movement inputs. So you can use it along with your input class (since it won't move your character or won't need example PlayerController component). Also you can change use key on inspector on both.
You can use your own Input class since they're just examples. You just need to implement a workflow to call StartStopInteractions() from Interactor.
PlayerController
PlayerController is taken from Standart Assets and modified. It handles some extra stuffs like entering/exiting vehicles, extra move abilities and climbing.
You can use your own Controller since Interactor works with any Controller.
AnimatorCallback
Animator Callback is a mini script that helps you when you have your Animator component on a different place other than Interactor gameobject (Actually InteractorIK). If your Animator is on a different object, you can put AnimatorCallback.cs on the same object and assign its InteractorIK. Because InteractorIK has some functions that need to run at the exactly same moment as Animator's IK states. And if they're on different objects, they can't work in sync. This small script helps them to work in sync if your Animator and InteractorIK are on seperate gameobjects.
OrbitalPositioner
The OrbitalPositioner simply moves its child object and handles its rotation relative to its center.
To use it, assign the center object to orbit around (which is the player in this case), assign the InteractorObject as a child, and lastly, assign it to your player's OrbitalReach debug. Now you can use it in the editor or at runtime. If your OrbitalReach setup is done and its debug is enabled, you can adjust orbital animations' progress (Debug Duration) and layers weight (Debug Weight) in runtime to see how your character reaches it from different angles, heights, and distances. If you're not satisfied, you can adjust OrbitalReach calibration settings accordingly.
You can watch its tutorial at videos section.
FreeLookCam
This is a regular camera script to control third-person orbital camera. It’s a bit modified to lock the cursor with right click easily. And also has a tiny method for locking Y-axis when interacting with InteractiveRotators.
VehicleBasicInput & BikeBasicInput
Basic Standart Asset scripts for vehicle inputs. The vehicle has some extra methods for controlling its windshield & back door animations.
VehicleController & BikeController
Mildly modified Standart Asset vehicle scripts. The vehicle has accelAmount and steerAmount for Pedals and SteeringWheel to tell their rotation amounts. The bike has a method for pedals to look always up when rotating with front wheel on FixedUpdate().
VehiclePartControls
VehiclePartControls is for vehicle animation examples and gets every interaction object on the vehicle and caches their animation strings as IDs. Then stores them on their InteractorObject classes to use later when interacted. If that part has an animation state on the vehicle’s animator, then it will activate their animations when interacted. Some animations like Elevator, Back door and Windshield have their animation events on their animation files to automatically deactivate themselves.
TurretAim
ProtoTruck example scene has turrets to show a non-human player example. Turrets and their lights aim to their targets with different speeds and fire in this script. Also shot targets get their push force from here.
Pedals
Pedal rotation class gets accelAmount from VehicleController for rotation amount. Both pedals have it.
SteeringWheel
Steering wheel rotation class gets steerAmount from VehicleController for rotation amount. So when rotating the vehicle, the steering wheel rotates accordingly with set limits.
HitHandler
Handler class for Manual Hit interaction. It rotates itself towards the player when enters the interaction area, repositions its target for a hit position. Moves the target back to original position on the object and applies the force when hit happens. It works like pivot and positioned between target and object as a buffer object in the hierarchy.
Hit Obj - InteractorObject for hit interaction.
Y Offset - Height of the target for pullback reposition.
Distance Percentage - Lerp between the initial target position and pull back position.
Angle - Angle between the initial target’s position and effector’s position.
Hit Force - The force to be applied when hit by body part to target’s parent (InteractorObject).
Caution: This class will be deprecated!
InstantiateRandomAreaPool
This is a really useful class for spawning prefabs from a determined place randomly on runtime. Also pools the prefabs on start for maximum performance. Set its sizes with transform scale and pooled prefabs will be randomly spawned in its boundaries. They can be spawned by pressing the Enter key or calling SetPooledPrefabActive(int count) method in the script or called by the events with count to spawn. Gizmo will show the spawn area. Prefab array is for prefabs to spawn. Max prefab count is pool count and that amount of object will be pooled on start.
BasicOnOff
Very basic on off script for setting assigned gameobjects active or inactive. It has an array for gameobjects and Toggle() script for calling from code or events.
DigitalDisplayTextFloat
Sets Text Mesh values with a prefix, multiplication and determined decimals. It is used for the console terminal’s digital frame to show graph values.
InteractiveRotator
Rotator class is used for rotating interacted objects with mouse Y input. It has settings for adjusting the rotation amount and style. Console rotators and Gumball crank use this to showcase in example scenes. Set the direction and it will rotate constantly with given settings during the interaction time with mouse Y input.
This class will be improved on upcoming updates or on v1.0. It is currently in a temporary state.
InteractiveSwitch
Switch is also rotating objects when interacted but also can change positions too. It works one time when interacted, unlike rotators. It has its own events and you can add more than two events for each use and it will cycle these events. So this way you can have more complex animations on the object. It is used for OnOffButton and WaveTypeButton on the console in the example scene.
This class will be improved on upcoming updates or on v1.0. It is currently in a temporary state.
WaveGraphLineRenderer
Uses LineRenderer to draw mathematical functions like Sine, Square and Triangle wave types.
AutoMover
Used for changing rotation & position values with determined duration and ease type. The ability for tweening targets in runtime creates a new set of possibilities while interacting objects.
This class will be improved on upcoming updates or on v1.0. It is currently in a temporary state.
PathMover
A bit different version of AutoMover with multiple points to loop for the positions. It is used for Self Interaction targets and has an odd property to set its occurring chance.
This class will be improved on upcoming updates or on v1.0. It is currently in a temporary state.