
Interaction Types
Each interaction type is highly flexible and suitable for multiple purposes. Examples of all interaction types are provided in the example scenes. Each interaction type relies on a settings file (a ScriptableObject) assigned to the InteractorObject. While some interaction types share the same settings file during gameplay, others instantiate a new file at runtime (on Start) to store specific runtime values.
Also you can watch Creating New Interaction Type With Scripts Tutorial to create your own new interactions as well.
Default Once
Default Once does not move any IK parts of the player but triggers events a single time when the effector rules are met. This behavior is particularly useful for using effector rules as sensors to activate InteractorObject events. Once triggered, the event will not fire again until the InteractorObject exits and re-enters the effector area.
Manual Switch
Similar to Manual Button interaction but more customizable. An interaction object can have InteractiveSwitch component to animate itself with its own events. You can add multiple events to InteractiveSwitch and every time you use this object, it will loop these events one by one. These events also have position and rotation values for creating different button/switch animations easily. For example, one event for a button-up position and one event for the down position will make you a quick button animation. You can create more than two states to animate the object. In the example scene, the console has both examples on “OnOffButton” and “WaveTypeButton”.
Manual Rotator
Like Manual Switch, Manual Rotators have a component to animate itself. IteractiveRotator component can be added on the interaction object to rotate it constantly with mouse Y input. It also has it’s own events to start when interacted but unlike Manual Switch, it can have only one event (But it’s a list so you can add more stuff to start all together). Rotator has a direction setting and when interacted it will rotate on that axis. Since it will rotate constantly until the interaction end, the player can control this object precisely as he/she wishes with Mouse input. Gumball crank and console rotators use this component. Manual Rotator also locks the camera Y-axis when used because it is using that input.
Manual Rotators and Switches can be used with AutoMover class (on interacted IK parts). So while they are animating the object itself, AutoMover can animate the target accordingly. All examples have this feature, you can inspect their child targets to see AutoMover settings.
Touch Vertical
When the Touch Vertical type interaction object enters the trigger, it will be checked by a raycast in every 10 frames to check if the object or the wall is in a good position to interact. Raycast settings are on InteractorObject. Once raycast hit is in a good position for that effector, the interaction will start after the cooldown timer ends.
And it will continue to raycasting in every fixed update frame to move target with raycast hit. If raycast hits an out of range position or not that interaction object, the interaction will end.
Touch HorizontalUp
Touch Horizontal Up works pretty similar to Vertical one except it will raycast to upward direction with a forward offset to detect wall edge earlier.
Touch Still
Touch Still is quite simple, if InteractorObject’s child target is in a good position for its effector (selected effector type), then it will start interaction as long as it stays in a good position. Once it’s out, then the interaction will end itself.
Touch interactions are fully automatic and need no player input.
Distance Crosshair
Distance Crosshair interaction objects will enter Interactor’s object list (sphere trigger) when the crosshair is on them. There is a camera raycast to detect them and that raycast’s distance can be set on Interactor > Raycast Distance.
There is no effector check for distance or angles. And they will be useable once selected on UI and used with a mouse click. They use different input keys because this way players can use them without conflicting themselves. For example, you can use truck doors while holding pick up items or driving the tricycle.
Distance Range
This interaction is range-based and uses the range specified in the settings file of the InteractorObject. Effector rules are not checked in this type; however, the Obstacle option of the InteractorObject can be used. When the InteractorObject enters the defined range, its events will be activated. In the example scenes, vehicle doors utilize this interaction type with the Obstacle feature enabled. As a result, if the door is on a different floor, it will not be activated because the floor acts as an obstacle, blocking the raycast.Multiple MoveBody
The Multiple MoveBody interaction type requires the Body effector and uses its rules to check for the start input. All effectors can be used along with the Body (both hands and feet). It has some settings to move the player while disabling the player's colliders with registered rotation. So, when the interaction is over, the colliders, position, and rotation can remain the same.
It is useful for sitting on a couch or a vehicle seat since it uses more than one effector. When used, all child effectors will start their interaction if they are not busy or using an interruptible interaction.
If you wish to use this for entering vehicles or sitting, you need to add events to disable player inputs and re-enable them when the interaction ends. Otherwise, the player will be able to move while their body is stuck in the interaction. Example scenes offer similar setups with events in the scenes.
Self Interactions
To create self interactions, you’ll need an empty gameobject attached to the player (spline bones would be better since they move with player idle animation accordingly). On that gameobject, add InteractorObject and as many as child targets to create self interactions. There should be a PathMover component on targets to create its animation (tween). Self interaction will get PathMover’s odd’s and select randomly to start that interaction according to its possibility (Only when the player is idle, checked on PlayerState singleton on the scene). Selected and started interaction will start its PathMover points. See examples on the player at example scene.
Pickable OneHand
The one-handed pickable system offers remarkable flexibility, providing numerous customization options. Each variable is accompanied by tooltips for easy understanding, and a comprehensive tutorial video is available with selectable sections, covering everything you need to know.
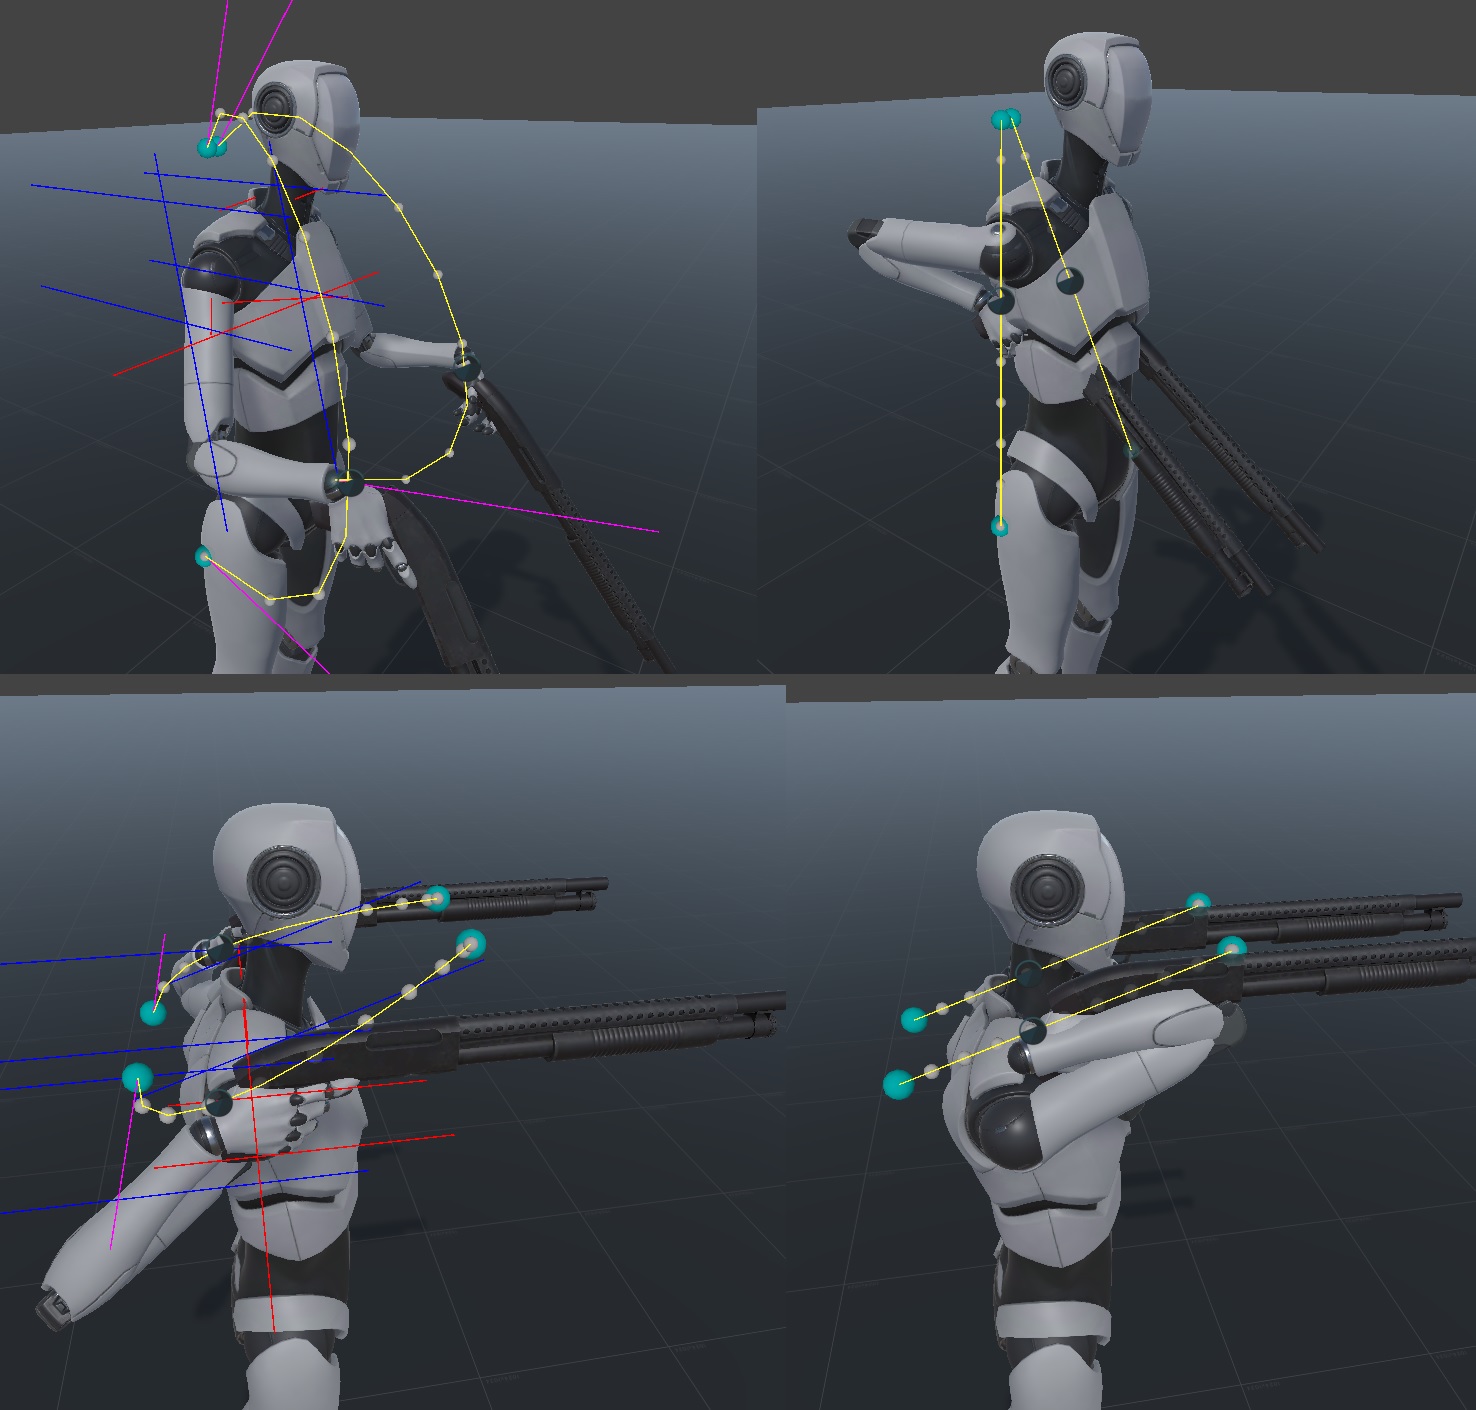
Pickable One also features a smart Procedural Bezier system designed for use when interacting with pickable objects. When altering hold positions or transitioning to drop/throw positions, hands will seamlessly adjust their positions in conjunction with the objects. However, a potential issue arises when the direct path between these positions passes through the body, resulting in an undesirable visual.
To address this, the system ensures a natural path by employing procedural beziers instead of a direct interpolation between two points. The system assesses whether these two points intersect with the shoulder lines (from top view, shoulder to shoulder; from side view over the shoulder to forward). If an intersection is detected, bezier curves are generated based on the arm length and specified bezier multipliers.
The default values for Bezier Multipliers (1f, 1f, 1f) are optimal. Nevertheless, users have the flexibility to fine-tune these multipliers to enhance curve heights for each axis, aligned with the player's direction. All you need to adjust proper min and max values for the shoulder area and the system will take care of the rest. When you enable debug option on PickableOne settigns, you'll see those shoulder lines and min & max values around the player when you change hold points.
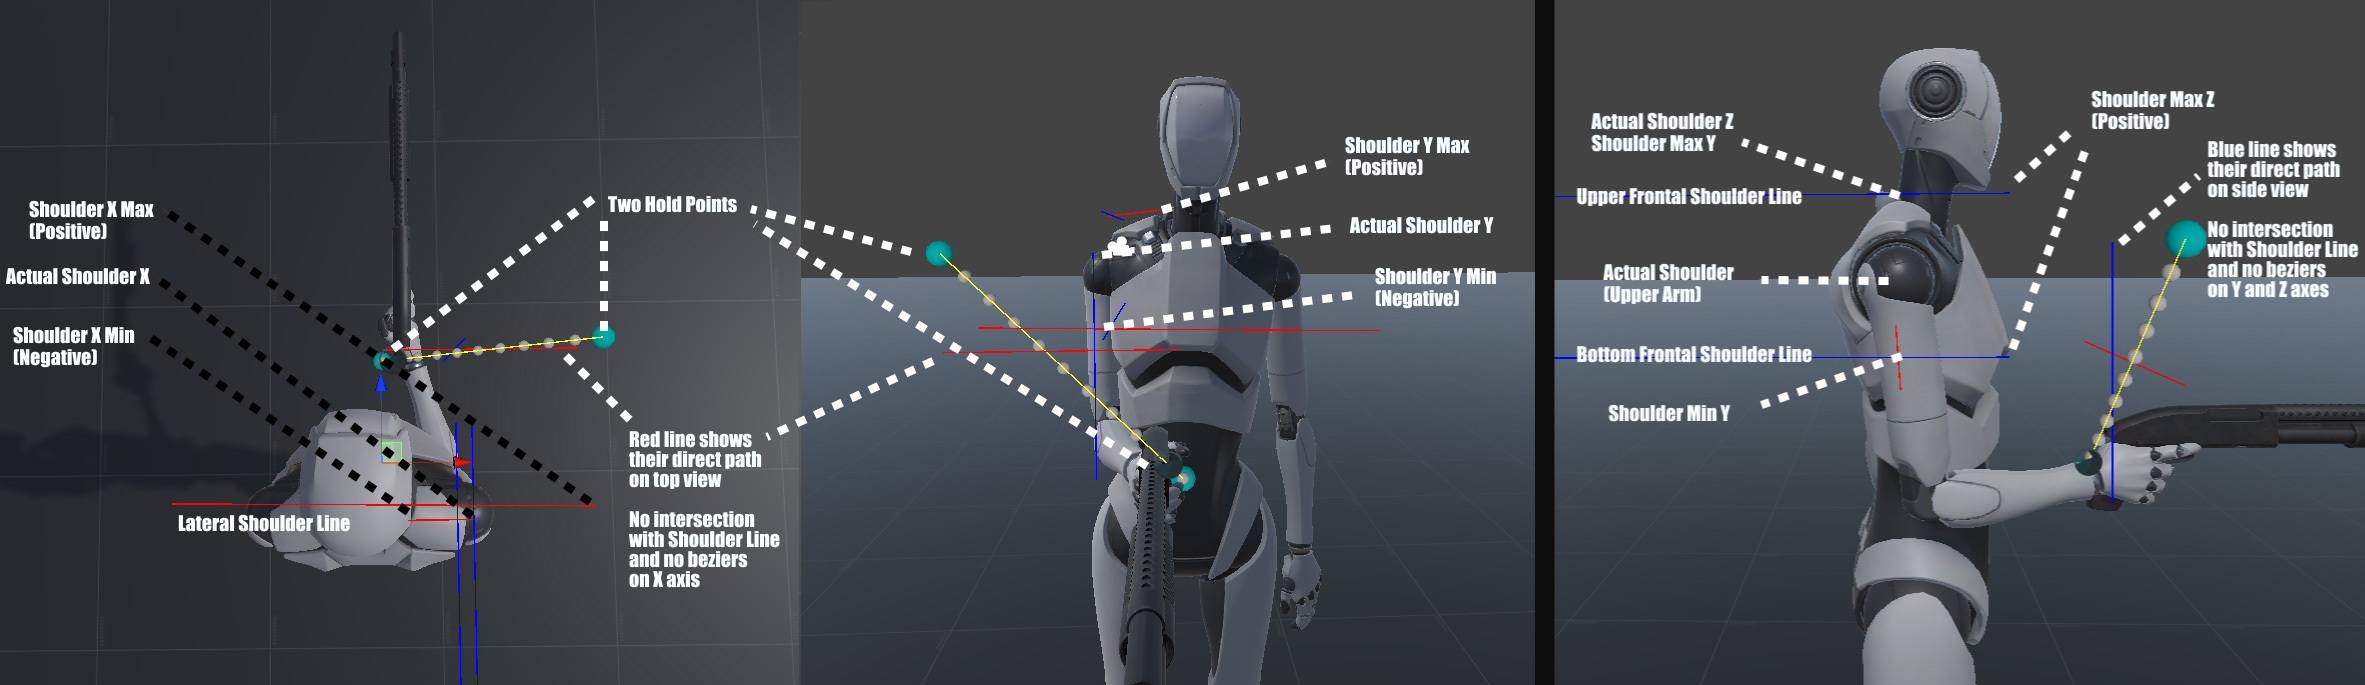
With and without Procedural Beziers
These Min Max will affect the shoulder lines; therefore, they will influence the activation of Procedural Beziers.
Shoulder X Min Max: The red line extends from the left Player to the right Player, typically spanning from shoulder to shoulder. When you alter your position, a new red line, often perpendicular to the original, is generated. This line illustrates the direct path between the position changes. If this new line intersects the shoulder X line, it signifies that the direct path will pass through the body, activating a bezier curve on the X-axis. The minimum value is the distance between the actual shoulder (upper arm) and your player's head, and it must be negative. The maximum value is the length of the line on the hand side and must be positive. By increasing the value, you activate the bezier curve when the object moves to the side of your body. Therefore, a longer length increases the likelihood that your side movement will trigger bezier curves on X axis.
Shoulder Z Max: The blue line goes from behind of the player to front of the player. It activates bezier curves on Y and Z axes when two points cross this line (from side view plane). Z Max value should be lenght of your frontal body. So when you change hold position up to down (or vice versa), it will intersect with this line and activate curves to go around them.
Shoulder Y Min Max: Each line (red and blue) has two pairs to display the Min and Max values on the Y-axis. The Min value defines the extent to which you want to utilize the area behind the shoulder. It represents the height difference between your shoulder (upper arm) and the designated area behind the shoulder, allowing your hand to reach behind the shoulder above the body. This value must be negative. On the other hand, the Max value is the positive difference in height between your shoulder and the precise point where your shoulder top ends. This positive value determines the upper limit of the shoulder.
Pickable TwoHands
TwoHands interaction type is a bit old and will be refactored with more flexible and easy system like OneHand system on v1.0. Currently system checks both hand targets if they're in effector rules and becomes interactable when both hands are green. Then Interactor picks the object and moves it to given player relative position. OrbitalReach doesn't work with TwoHands but you can use AnimAssist animations with it (like crouching).
Push Pull
Pushing (Pull is not ready yet) is similar to pick ups. It waits for both hand effectors to get in position to activate and when used with input, it will start both hand IK animations. Hand animations pause on the object and the object will be a child of the player to move with it. Also, BasicInput component gets the pushing state from PlayerState singleton and decreases the forward movement amount by half. That makes player movement slower to create the impression of pushing or pulling an object.
Once this interaction done with upcoming updates, it will also affect body (and maybe feet) to create a more realistic pushing pose for player.